Gradient
Tutorial
In later blog posts I will discuss and explain all of the
experimenting I have done prior to making my final DVD inlay. While undertaking
this experimenting I developed an idea using the sky. My vector shapes layout
which was posted a few days ago shows how I intend on my final DVD front cover
to have the main image at the bottom. I am not very keen on having this image
just simply stop with a harsh line across the front of my inlay and hence I needed
a solution. For this reason I did some research around Photoshop and came
across a tutorial on adding gradients to images. This seemed like a good
solution to my problem. I tested this on an image of the sky so I got an idea
of what this could look like as a final piece.
What did I do?
To begin with I simply used to the internet to find an image
of the sky. This original image can be seen below. Reference - http://all-free-download.com/free-photos/blue-sky-clouds-background.html
- Accessed 20/02/2014.
I then opened this image into a blank Photoshop canvas. The
first thing I did after this was create a new transparent layer. To do this I simply
went to Layer, New and then Layer. I then copied and pasted my sky image into
the new transparent layer. I then used the Gradient Tool, this can be found in
the Tool Panel down the left hand side of the screen. A new Tool Bar appears
along the top of the screen, the second icon in (Gradient Picker) allowed me to
select which gradient effect I wanted to use. Due to the fact that my DVD inlay
is likely to use a lot of white I decided I need my gradient to fade out to
white. None of the standard gradient tools allowed me to do this and hence I had
to customise one. I selected the ‘Neutral Density’ gradient tool and then
opened its settings to change the colours. I simply clicked on the coloured
marker and changed the colour of this from black to white. I then simply
clicked ‘Ok’.
The next aspects I needed to change was the type of gradient I
used. There are 5 different types to choose from, Linear, Radial, Angle,
Reflected and finally Diamond. Each symbol represented each type gradient and
hence I didn’t need to try each one to decide which I wanted. I selected the
Linear tool.
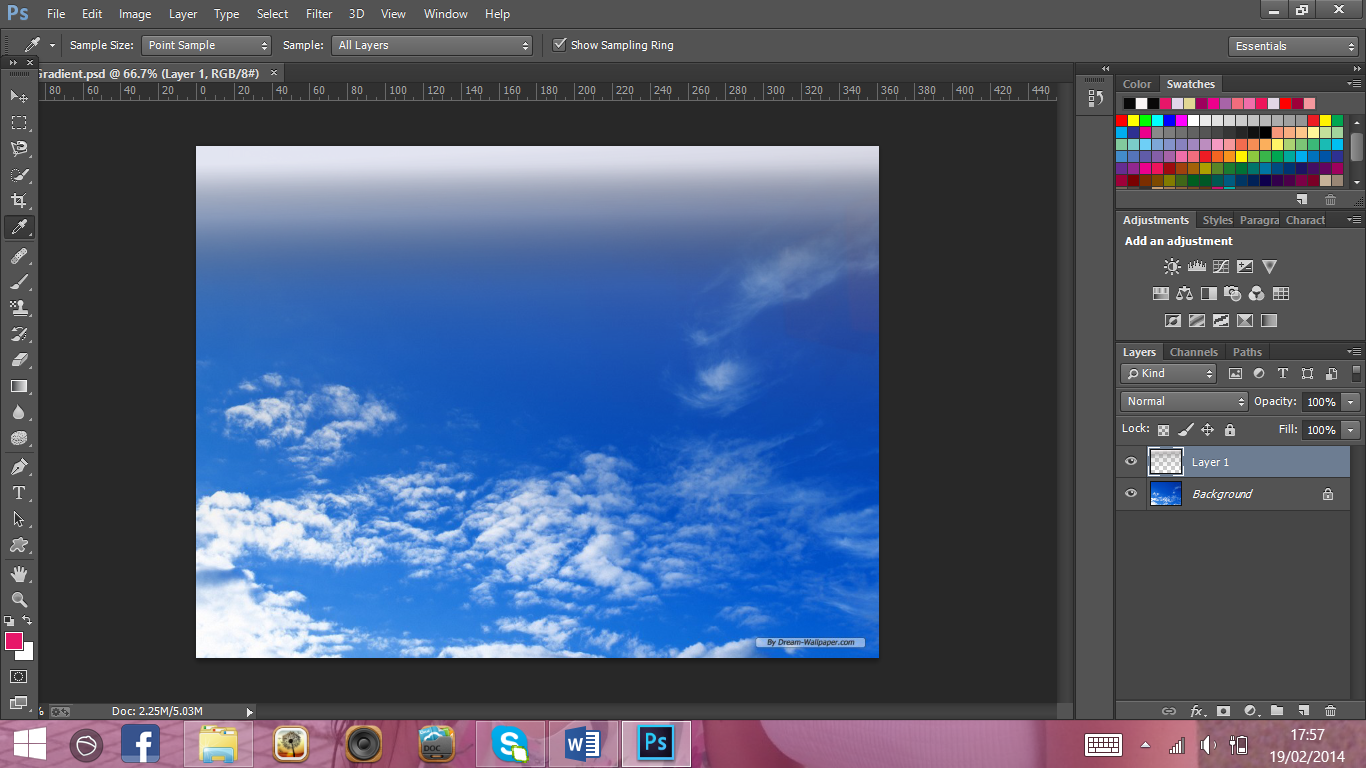
To apply this gradient to my image I simply dragged the gradient
line down the middle of my image from top to roughly one third of the way down.
The white aspect of the gradient was then at the top of my image and this faded
down into the image.
The below image shows how my gradient looked once finished.

My results
and evaluation:
The end result of using this gradient tool were highly
effective. This eliminated the issues I feel I would have had if I added an
image straight to my inlay. This gradient would allow one aspect of my inlay to
merge with another without leaving harsh lines. The perks of using this tool
are that I am able to change the gradient colour to suit the area I want to
merge together and hence I could use this technique in many different areas as
well as allow room for colour changes throughout the developing process. This
was a very simple effect to apply but I feel will help make my final piece look
professional and I definitely think this is a technique I will use towards my
final product. Although I did use a tutorial to help create this effect I adapted
it to suit what I was trying to achieve and didn’t stick to it solely however the
reference link is: http://www.youtube.com/watch?v=NxJi6l4d2wo
and this was accessed 19/02/2014

No comments:
Post a Comment