Wednesday, 30 April 2014

Premiere - Changes After Exporting

When I thought I was in a place were I was happy with my final trailer I exported this to see how it played on the given media player. I was then able to look at my trailer much better to see any room for improvements.

After viewing my exported draft of my DVD trailer I found two areas which I felt required attention. These were a transition towards the middle of the trailer and the majority of the title clips except the rolling title and the cinema date at the end of the trailer. From this I was then able to open up my Premiere project and play around with these aspects again.
 
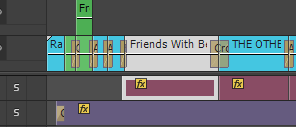
After playing with the transitions which is in place between the Housekeeper and HusbandAndBrother clips I decided that it might not actually be the transition which is the problem. I think I trimmed the clip too much which left some of her speech cut off. This was causing this aspect to both look and sound funny. I trimmed this clip again to make sure the clip started just before she began speaking. I then decided to change the transition which was on this clip to Cross Dissolve. I finally moved this transition back into the previous clip more so that the transition didn't take over what the actor was saying. This can be seen below.

I then felt that the titles were really hard to read. I was surprised with this aspect as in the preview screen I was really happy with the way these looked however on the bigger screen these looked stretched and unprofessional. The colours I had chosen to use also didn't really work together and hence I was then able to change these. I decided to use a black Outer Stroke as this made the title stand out. I then adjusted the width of the text to make it narrower and finally the overall size so that it wasn't quite so prominent on the screen. These changes made the title screens look more professional and also a lot easier to read.
 
Once I had made these changes I then needed to export for a second time, to do this I simply followed the exact same steps which I had the first time. All of this can be seen in the previous blog post.


Premiere - Exporting My Final DVD Trailer

Once I was happy with my trailer I had made in Premiere I was able to export the media in order to play this from a media player such as VLC or Windows Video Player. To export my DVD trailer I used the File, Export and Media options. This brought up a large dialog box which had a variety of options to change and adjust based on how you want the media to export. Both of these stages so far can be seen below.


From my assignment brief the exporting aspect of this project had mandatory settings which I had to use in order to pass. This stage was vital in achieving this as I was able to adjust the format and the preset to meet this criteria. The following paragraph was taken from the module guide which shows the mandatory features my DVD trailer must cover.

'This must be edited in Premiere, and you may import previously created elements from Photoshop or Illustrator. You will be expected to demonstrate, at minimum, import images and video, setting up a Premiere project with the right frame size and frame rate (and widescreen), trimming clips, adding transitions to clips, and adding titles over clips. You will submit this video as a Quicktime movie file encoded with the DV codec.'

From this you can see that my project must be the right frame size, frame rate, be widescreen, be a Quicktime movie and use the DV codec. The frame size and frame rate options were set when I created the sequence at the very beginning of the project. I will run over this again in my evaluation. The widescreen setting was also set at this point and again will be run over in the evaluation. The Quicktime and Codec aspects were set at this exporting stage. The first option down the right hand side of the screen gives the option to change the format that the DVD trailer is exported in. For this I was able to chose Quicktime and hence hit this aspect of my criteria. This can be seen below.


The next editable option was Presets. This allowed me to hit the DV Codec aspect however there were a wide variety of options which I could use. The sequence I previously created used DV PAL and hence I used the same format here as when I created my sequence. The reasoning's for choosing this Codec can be seen in an earlier blog post.


All of the other settings here were left at default. I then selected Export were the following dialog box appeared. Once this was finished I was able to watch my DVD trailer without the use of Premiere.


Premiere - Importing Media From Tutorials

So now that I had undertaken my lightening tutorial I decided that I would like to use these in my final DVD trailer after all. Although I could in theory just trim the clip and start from scratch all in my Assignment project I felt that it made more sense to actually export the clip I was happy with from one project and then import into my assignment, this would save time but I was also really happy with the look I had achieved from this tutorial and for that reason felt no need to try to recreate this. With this project open I then simply exported the clip. I used the settings which were needed for my overall DVD trailer as this should aid the professionalism when I come to finally export at the end. The settings I used can be seen below.
 
This clip can then be seen saved in my documents as a Quicktime Mov file. This can be seen below.

 
The exported clip can be seen below.


I was then able to import this clip into the Assignment Project in the same way that I imported all of my full DVD movie trailers.

This stage was repeated for the second clip which I used a tutorial for and the screenshots to show this along with the exported clip can be seen below.


Tuesday, 29 April 2014

Premiere - Lighting Tutorial Part 2

The Lighting Tutorial which you can see in my previous blog went on to look at adding the lighting effect to a brighter image. This was something I looked into however after looking through my DVD clips I couldn't find a suitable option. For this reason I began to look at some of my darker clips and how I could use the similar technique but to add a lighter section to a darker image.

The tutorial went on to use the same Spotlight effect however due to the fact that I was using a similar styled clip I decided I would look into the Omni light type. This works similarly to the spotlight however as opposed to the oval shape the Omni creates a circle of intense light. You can adjust how big the circle is to distribute the light differently however the centre of the circle is always the most intense. This light type has much fewer settings than the spotlight however I like this effect equally as much. The screenshot below shows the settings I changed. The intensity of this effect adds a really bright light in the restaurant window which will become clear in a later image. I set this to be noticeably bright however I don't think it looks out of place.


The two images below show the before and after of adding this effect:

Before:

After:

This lighting effect has switched the focus of this clip. This has helped me because the actor in this clip is not actually in my DVD trailer however because he is now not the main focus of the clip I think I could get away with using it as claiming he is simply a passer by. I really like the effect I have added to this clip and the way I have been able to change the focal point.

It is worth noting at this point that I then exported this clip and used it as part of my DVD trailer. This scene can hence be found towards the end of my DVD trailer.

Premiere - Lighting Tutorial (Spotlights To Dark Scene)

While I have been experimenting with the different tools of premiere I decided that I would look at some tutorials in order to learn new skills and hence look at ways in which I could go above and beyond for my assignment. The tutorial would not upload to this site in a higher quality format and hence the tutorial is in low quality however the following details can track the tutorial I used. Sourced: https://www.youtube.com/watch?v=EsZOhSSvOfw - Accessed 31/03/2014.
 
 
As stated in my previous blog post I have not gathered various clips which I could use for my own DVD trailer. Based on these I needed to find a clip which had an evening or ideally night scene so I was able to fully show this tutorial. I decided to take a clip from the Midnight In Paris movie trailer. I imported this into Premiere and then used the mark in and out tools to cut the specific piece of footage which I wanted to edit. With this in place I was then ready to start the tutorial.

So with this now set I began the tutorial. I started by adding the Adjust, Lighting Effects to my clip. I then used the Effects Control panel to adjust this effect. Obviously because my clip is different to the one used on the tutorial my settings differed slightly based on what worked best for my own clip. The first three settings which I changed were Ambient Colour, Ambient intensity and finally the exposure. These settings adjusted the overall lighting of the whole clip. This was the basis to set the scene. The settings which I changed can be seen in the below screenshot.


With the general lighting of the clip improved the tutorial went on to look at the different Lights (1-5). These acts as spotlights so you can edit the lighting of a clip in specific places. This is what I wanted to do. With Light 1 selected I changed the light type to Spotlight and then used the icon spotlight positioning icon to adjust the size and shape of my spotlight. This can be seen below. I decided I wanted to add a spotlight to the streetlights in this clip and hence my spotlight is positioned here. This is similar to the tutorial.


From here I was then able to use the effects in the Effects Control panel to edit the intensity and focus of the light. The settings I chose can be seen below. I chose these settings as they give a subtle yet effective look. The light isn't too bright as this made the effect look fake which wasn't what I wanted at all.


Once I had changed these settings I then took a look at the clip again. I then decided that actually the clip was a bit bright and hence the effect wasn't too noticeable and I hence changed the exposure and the ambient intensity. This can be seen below along with the clip with the effect to the light added.


The tutorial then went on to add a different effect to a different clip which I will discuss in a separate blog post. Based on the steps I took above I then repeated these stages to create the same effect for the second light in the street. I did leave this to just the two lights as these are the biggest and most noticeable two. I feel that if I was to add this effect to the smaller lights the clip would begin to look fake and become overpowered by this effect. The image below shows a before and after shot for this tutorial.

Before:

After:

You can clearly see from this that the lighting around the two lights is now much brighter and gives off the impression that the lights are actually working correctly. I really like this effect and hope to use this particular clip in my final DVD trailer.

Premiere - Split Screen Tutorial

When looking at different effects and techniques I could use for Premiere I came across the following tutorial. This split a video clip into different sections to create a different look. The tutorial and link can be seen below:


 https://www.youtube.com/watch?v=rEQ8xJ_Fon8 - Accessed 27/03/2014

So what did I actually do? I started by opening a video clip into Premiere. I had already sourced some clips for my DVD trailer so I simply used one of these. With this imported I then Marked In and Marked Out to create a smaller clip. I saved this to my sequence and then added it to the timeline. I duplicated this three times to create three different layers as such. I then selected the clip on V1 and used the Toggle Track Lock button to ensure I don't mess with the other two. I then used the effects panel and selected Transform, Crop. I dragged this on top of my clip. From there I was then able to use the Effects Control section to crop the clip to a given point. For this layer I kept the footage the same however for V2 I cropped this 37% from the left and V3 was cropped at 68% from the left. These can be seen in the below screenshots. 


The next stage of this tutorial was to add a transparent video. To do this I selected File, New and then Transparent Video. The dialog box below then appeared. 


These settings are all the same as those which I previously set when I first created the Project and hence I left these settings and simply clicked OK. This then created a new element in my project file. This can be seen below.

The tutorial then went on to create colour matte's. I created these along with the tutorial however I deleted these on my version. All this should become clearer towards the end. But to create the colour matte I went to File, New, Colour Matte. A colour matte is simply a clip which is a solid colour. It is often used to separate clips and to act as a background for text. The dialog box below then appeared:
 
 
As with the transparent Video settings I left all of these the same. After clicking OK I was then given the option to change the colour. I set this to white as stated in the tutorial. This can be seen below. 
 
With this complete I simply had to name my colour matte and then it appeared in my projects section, this can be seen below. I duplicated this for each video in my sequence (three).
 
These were then added to the beginning of each clip. The final stage was to copy the Crop settings from the video clip to the colour matte for each video layer. To do this I simply used the Copy and Paste technique.

You can see in the YouTube clip above what the end result should be however mine didn't look anywhere near as professional. I wasn't happy to just scrap all that I had done and hence I began to play around with the clips. I ended up rearranging them and then removing the colour mattes. My final piece can be seen below. This is not the same as what I had hoped however I really like it and I feel the mixed up scene is really effective. This is a technique I could look at using when I come to make my final trailer. 


Sunday, 27 April 2014

Premiere - Extras To Improve The Readabilty Of The Timeline

From the tutorial which I previously followed I found ways to improve the readability of my Premiere timeline. These really helped when it came to finding out which clip was which as I was able to add labels. I added these labels in the same way shown in the tutorial. The screenshot below shows my timeline with these labels added. You can now clearly distinguish between each aspect for example all of the voice overs from the clips are labeled in the colour Rose while all of the song clips can be seen in Violet. 


The next aspect which I added to improve my timeline was to group the video clip with the sound clips which accompany this. I had previously ungrouped these to help me move and edit my timeline however now they are in the correct place and with the relevant video clip it makes sense to group them together again. Like in the tutorial I simply used the group button which can be found after a right mouse click. The screenshot below shows these elements grouped back together.


The final aspect which I took from this tutorial and used for my own timeline was the markers. I followed the same technique which can be seen in the Hints And Tips Tutorial blog post to add these markers to my timeline. Adding markers across my timeline really helped as I was developing my trailer. I was able to add transitions and effects and then use the markers to show where I was up to so that when I came back to look at my timeline I could clearly see what I needed to do next. The screenshots below show the details of these markers and then the markers on my timeline.


Premiere - Hints And Tips Tutorial

This tutorial was the first tutorial I found. This looks at basic hints and tips in Premiere rather than actually showing you how to edit a clip. I liked the fact this was a different style of tutorial. The video below shows the tutorial I used. Source: https://www.youtube.com/watch?v=Hnp5i-S6M6I - Accessed 31/03/2014.


The first thing I needed to do to undertake this tutorial was create a short premiere video which had multiple clips. To do this I simply used the clips which I had already gathered for the assignment and then randomly cut them to create smaller clips. My timeline then looked like below.


Groups:
The first aspect which this tutorial taught me was to group different elements in my timeline. When I placed the clips on my timeline I was had a range which were related to the Friends With Benefits film, a range which were related to Midnight In Paris and finally a range which were related to The Other Woman. All of these are separate clips but are related in terms of which film they came from. To make my life easier when editing I am able to group these clips together. To do this I simply selected all of the clips I wanted to group together and then used the File and Group option which can be seen below.

Now when I go to move a clip in this section it moves the whole group which makes life a lot easier. This can be seen in the below screenshot.


Labels:
Another way of determining each group on the timeline is to use labels. When I first saw this option I thought that it would be in text form however it is in colour form. To add a label to a clip or group you use the Edit, Label options and the select a colour. This can be seen below.


I then selected a different colour for a different group so that each group stands out on the timeline better. This can be seen below. This is a really good technique which I really want to use in my assignment as it makes each section really distinguishable.


Sequence, Go To Gap:
This next step in the tutorial is another handy tip to know. It allows you to find any gaps between the clips added in your timeline. Although there may not look to be any gaps there sometimes are hidden elements which will create a black screen and could ruin the look of the final DVD Trailer. This tip will eliminate that. I began by placing all of my clips together apart from one. I deliberately left one with a gap so that I could really see how this works. To check for gaps I used the Sequence, Go To Gap and then finally Next In Sequence. This then takes the play head to the beginning of the gap. You then select the gap between the two clips and simply use the delete button on the keyboard. The screenshot below shows the Go To Gap selection and then the timeline now gap free.

Add Marker:
The final aspect which I have taken from this tutorial is to add markers. This is another small aspect which I had no idea about before looking at this tutorial. Adding a marker can help when developing a premiere clip as it allows you to leave comments at stages throughout the clip for you to come back to at a later date. They could also mark important points throughout the video. To add a maker you simply move the play head to the place in the clip where you want to add your marker and then right click with the mouse and select the Add Marker button. This can be seen below.


This simple adds a marker on the timeline. To take this one step further you can double click on the marker to open the extra settings. This is where you can add comments and reminders about that stage in the video. I really like this little extra and will be using markers in my final assignment.

Although all of these elements are only small touches I personally feel these can really make my timeline clearer and more understandable. This will be particularly useful when I come to submit this project file.


Premiere - Adding Video Effects

Now that I have added my transitions and audio to my DVD trailer I began to look at what effects I could add. As you can see in my previous blog posts regarding the different effects, presets and lumetri looks I have fully explored this aspect and am now going to look at ways which I can apply this to my own work. I began by looking at the lemetri looks, I decided that I wanted to make the clips in my trailer more sunny and appear warm. This is based on personal preference as I personally think the warmer tones look much better. The lemetri look which I opted for in the first instance was Warm Overall. This can be found in the temperature panel. This can be seen below.


From the panel in the screenshot you can see above I was then able to drag this over to my timeline and then effect is then added. I decided to add the Warm Overall to the 'We Should Stay Friends' clip. The screenshots below show the before and after of this.

Before:

After:
As you can see from these two screenshots the 'After' screenshot uses more oranges and hence the guys face seems much warmer were as the 'Before' image looks much colder. As mentioned above this effect was added as a simply personal preference and I feel the clip now looks much better. 

The next lumetri look I added was to the clip directly after the above, this is 'Housekeeper'. I decided to add the 'Warm Midtones' look. This is very similar to Warm Overall however this look only warms the midtones rather than the clip as a whole. This was added to my clip in the same way which I mentioned above. The screenshots below show the before and after of this.

Before:

After:
As you can see from these two screenshots the 'After' screenshot uses more oranges and hence the guys face seems much warmer were as the 'Before' image looks much colder. As mentioned above this effect was added as a simply personal preference and I feel the clip now looks much better. This lumetri look is more subtle than the previous and this appeals to me. 

The third lumetri look I have added to timeline is the Warm Overall. I decided to add this look to the 'HusbandAndBrother' clip. This is based on the fact the actors are wearing strappy tops and it hence looks like a warm scene. The Warm Overall look enhances this and I hence feel this is worth adding for personal preference as well as to enhance the scene. The screenshots below show the before and after of this.

Before:


After: 
The forth Lumetri look which I have added was to the 'What Shall We Do' clip. The look which I added was 'Warm Gamma Mix'. This works similarly to the previous in terms of warming the overall appearance. This was added to my clip in the same way which I mentioned above. The screenshots below show the before and after of this.

Before:

 After:

From the above screenshots the difference between these two clips seems very slim however when you look at this aspect on Premiere you can see the difference is much greater. This was the last Lumetri look which I have used. From here I then went on to looking at the actual Video Effects. The first one which I decided to add was a brightness and contrast. The first thing to note about this that the Lumetric looks have no editable settings where as the general Video Effects allow you to adjust various features based on which effect you chose to use. I added the Brightness/Contrast effect onto the Paris Scene 3 clip. This was an evening clip already however I wanted to adjust the brightness and contrast to make this clip appear slightly darker. The settings I changed to achieve this look can be seen below.

The screenshots below show the before and after of this effect.
Before:
After:

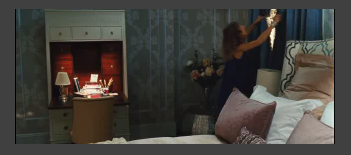
The next effect which I have added to my DVD Trailer is Color Balance. Using this effect I was able to adjust the Reds, Greens and Blues in the clip. I decided that I would try to make it look like a blue shadow with a general red tint to make the room look like it is decorated differently. The screenshot below shows the settings I changed to create this look.


The screenshots below show the before and after of this effect.

Before:
 

After: