So now I have looked and experimented thoroughly into Photoshop, its tools and existing DVD products I have begun to actually create my final DVD inlay. I decided to start with the most simple yet possibly most effective area of my inlay - the DVD spine. After researching I decided that my I preferred a simple spine and this was the look I have ultimately gone for. The very first step I took was to create a white background for my spine. To achieve this I used the shape tool. I set this to the Rectangle tool and pulled it out over my spine, the guides I previously created in my template helped to click the edges of this into place. I then locked this layer to prevent any further accidental changes. My next step was the most simple of this stage. I added the age rating image, to do this I simply used the File, Open options and then selected the whole image using the Marquee tool and dragged this into my template document as they were two different workspaces prior. I then resized and positioned to the bottom of my spine. The age rating used along with the source can be seen below:
Sourced - http://bilborough752.blogspot.co.uk/2011/11/research-age-certificate-min.html Accessed 21/02/2014
So now so far my DVD spine looks like the following:
The next stage of my spine creation was adding the DVD title. This was by the far where I put the most effort in within this section. The spine is normally the first thing you see when selecting a DVD and hence I needed to make this eye catching. The first aspect I faced was the font, after trial and error I decided upon - Harlow Solid Italic. This gave off a girly appeal due to its swirls and soft edged but I also prefer the Serif edges. More information on font styles will follow in a later post. Next I decided on a font size, I decided this would be 18pt. The only reasoning behind this was the fact that I needed a font which would stand out and be readable without over powering my whole spine.
I then looked at colours. Due to the fact that I used a white background gave me much more scope to play around with this aspect. The most important thing for me was sticking to my colour scheme and hence using one of the colours from my swatch. The colour I chose for the main text was 'Deep Pink' this is ed145b on the colour code. This stood out but didn't look as good as I had intended and hence I then looked into different effects which I could use to make this fulfil my expectations. The first effect I added was the Bevel and Emboss. To achieve the look I have I simply played around with the settings until I found something I was much happier with. The screenshot below shows the changes I made to the default settings in order to achieve the effect I have.
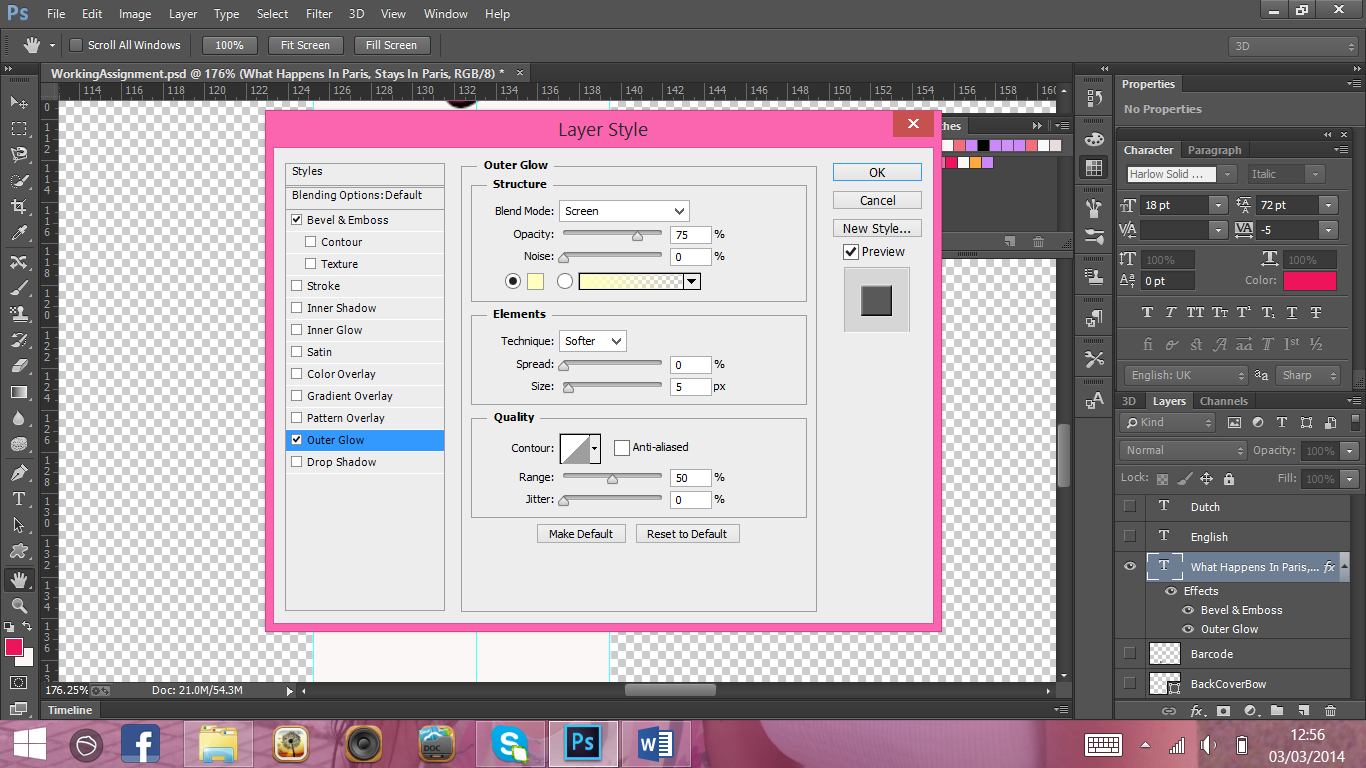
The final effect which I added to my spine title was Outer Glow. This added a softening effect which also made my title stand out better. Again like with the Bevel and Emboss effects I simply played out with the settings until I found something I was much happier with. The screenshot below shows the changes I made to the default settings in order to achieve the effect which I have.

So now lets review where we are. The screenshot below shows my DVD inlay spine up to this point.
The final step I took in the creation of my spine was to add some extra detail. I felt that the title alone was not enough to create the effect I wanted to and hence I began to look into the Custom Shape Tool. Within this section I played around with hearts and bows in my experimental stage. I ended up preferring the bows and hence this is what I ultimately went for. I added a first bow above the title. To create my first bow I simply used the transform tool to adjust the size to fit in the way I wanted. The size for this is - 12.9 x 13.0. The next stage was to adjust the colour. To keep my spine consistent I used the same colour for my bow as I did my text and hence this is 'Deep Pink'. The colour code for this is: ed145b. Now I created one I simply duplicated the layer to create an identical copy. I then repositioned this to between the age rating and the bottom of the title.
The screenshot below shows my final DVD inlay spine.
Although I could evaluate each individual stage of my DVD inlay I have decided that it is the overall appearance that is key and hence I will evaluate at the end once I have finished my whole inlay. I also plan on gathering feedback and then evaluate based on this feedback.


No comments:
Post a Comment